How To Make Your Duct Tape Double
When sewing or tailoring your own clothing, there is little in this world that is more helpful than a dress form in your size. But dress forms in the standard size 6 are expensive enough. Try buying one that’s adjustable, or even plus-sized. It sort of defeats one of the main purposes of the whole D.I.Y. thing. So what’s a girl, or guy for that matter, to do? Hey, you already make your own clothing. Why not make your own you? With a few cheap materials, and a little bit of time and effort, you can have a completely lumps-and-all accurate mannequin of yourself.
Materials:
2 rolls of Duct Tape - Go for the brand name stuff. No reason to skimp here. (~ $12-16)
1 8-ft 2"x4" board (of wood) if you’re 5’3" or under (~ $4-8)
or 1 10-ft 2"x4" board if you’re 5’4" or taller
1 way-bigger-than-your-size plain cotton undershirt (3 for ~ $5)
1 sturdy wooden hanger (~ $1-2)
2 bags of polyfill (3 if you’re extra curvy) (~ $4-8)
1 cardboard box (optional) (free if you get it from work or the liquor store)
(Materials Total: $26-40)
Equipment:
Something to cut wood with
Something to nail or screw wood with (tee hee)
1 pair of scissors
1 tape measure
1 willing and patient assistant that you don’t mind if they see you in your underwear
Making the base:
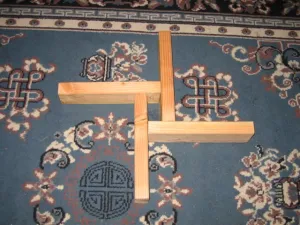
Get the 2"x4" cut in half at the store if it won’t fit in your car. (I drive a MINI Cooper. We had them cut it at the store.) Or cut it in half yourself. Then cut one piece in half and in half again. Holding the long piece upright, fit the four short pieces around it in a pinwheel as shown. Screw or nail them together, but not to the upright piece. The four-footed base should look like this:
[caption id="attachment_65" align="aligncenter" width="300" caption="Step 1: The Base"]
 [/caption]
This way, the upright piece can come off of the base for easy storage. Here is a picture of the stand put together:
[caption id="attachment_66" align="aligncenter" width="225" caption="Step 2: Assembled Base"]
 [/caption]
Getting Mummified:
Before you get started, don't have a full meal. Trust me on this. Don't start starving, but don't do this after you've just had Thanksgiving dinner and you're glad you wore your stretchy pants. Every imperfection of your torso will show here, so you'll want to minimize that while still remaining accurate.
Find a friend or significant other with a good eye for detail, who you won't mind if they see you in your skivvies. Strip down to said skivvies, and put on the undershirt. You'll want it to be big so it will hang down below your hip line. Assume the stance of a superhero who has just saved the day: back straight but not arched, hands on your hips, shoulders square.
Here's where your friend or significant other comes in. Note: Unless you were born on another planet and have super-long tentacles instead of regular human arms, you will not be able to do this to yourself. Do not try. If you are an alien, alter instructions as necessary to accommodate tentacles, horns, spikes, etc.
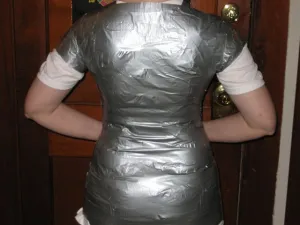
Start by wrapping around the upper arms. The key here is to make the duct tape snug, but not suffocating. Next, wrap tape above the bust and around under the arms. Try to fold the undershirt to fit as you go so you don't end up with awkward wrinkles. Wrap under the bust next, then around the waist, then around the fullest part of the hips. Continue wrapping around the body, following contours with the tape. Try to make the tape lie as flat as possible. Use short pieces if you have to, to avoid wrinkles in the tape. Do some crisscrossing pieces as you go. Continue until you are sure that the torso is wrapped at least two layers thick in tape. Here are two unflattering pictures of the CheapScot mummified:
[caption id="attachment_71" align="aligncenter" width="300" caption="Step 3: The Mummy"]
 [/caption]
[caption id="attachment_72" align="aligncenter" width="300" caption="Step 3: The Mummy Returns"]
 [/caption]
Note to women: if your assistant is a guy, or otherwise obsessed with boobs, he/she will spend a lot of time in that area. On the plus side, this part of the mannequin will be really, really accurate.
When the model is sufficiently mummified in duct tape, carefully cut the shell off. Be sure to not cut the skivvies or the person (or alien) underneath. Cut either up the spine or up both sides and on top of the shoulders. Remove the shell. Do not cut off the extra undershirt fabric. Here is a picture of the Cheap Scot's empty shell:
[caption id="attachment_74" align="aligncenter" width="225" caption="Step 4: The Shell"]
 [/caption]
Welcome back, model. Enjoy breathing again. Isn't it nice? Before your assistant wanders off, stand next to the stand and have your assistant measure across from the fullest part of your hips and mark the stand with a big black marker. If you want the mannequin to be the height of you in shoes, put on the shoes first. Mark the stand all the way around at the measurement. Now go put on some comfy sweatpants. You deserve it.
If You Want To Take This Apart For Storage (optional):
If you don't want a mannequin that stands defiantly in one corner of your sewing room, mocking your imperfections forever, you might want one that can come apart for easier storage. If you do want that, skip this step.
Before attaching the shell to the stand, wrap the stand from the top down to the hip mark in duct tape facing outward. Leave a few strips of tape hanging straight down past the hip mark to use later. Cut strips from the cardboard box in the width and depth of the stand, and stick them to the tape for stability later. Wrap this in duct tape again, facing in this time to hold everything together. Once the mannequin is finished, the body can slide off of the stand and be hung in a closet for storage. This is also a great idea if you'll be making clothes for multiple people and want to be able to switch bodies on the same stand. In case you need it, here's a picture of my stand wrapped in outward facing tape:
[caption id="attachment_76" align="aligncenter" width="225" caption="Step 5: The Stand wrapped for storage"]
 [/caption]
Putting It All Together:
Line up the cuts on the shell and tape it back together, inside and out. Lower the shell onto the stand, and line up the bottom of the shell with the hipline on the stand. Tape the stand to the inside of the shell at the small of the back.
[caption id="attachment_78" align="aligncenter" width="300" caption="Step 6: The Shell on the Base"]
 [/caption]
Insert the wooden hanger into the shoulders with some polyfill as padding. Tape the hanger to the stand.
[caption id="attachment_79" align="aligncenter" width="300" caption="Step 7: The Hanger"]
 [/caption]
Stuff the shell with as much polyfill as will stay in place. If you left strips of tape hanging on the stand, bring them up and tape them to the bottom of the shell. Otherwise, tape the shell to the stand. Tape across the bottom several times, leaving gaps on the sides.
[caption id="attachment_81" align="aligncenter" width="300" caption="Step 8: Stuffed"]
 [/caption]
Stuff more polyfill through those gaps until the bottom of the shell is full; then tape over the gaps. Continue stuffing the shell until it is full. Fold the ends of the sleeves over and tape the arms shut. Your duct tape double is nearly complete.
[caption id="attachment_83" align="aligncenter" width="225" caption="Step 9: Almost there!"]
 [/caption]
Measure around your neck, then make a ring of the same circumference out of duct tape. Tape it in place on top of the shell, as shown here:
[caption id="attachment_85" align="aligncenter" width="300" caption="Step 10: The Neck"]
 [/caption]
Stuff more polyfill down the neck, then tape over the top once full. Congratulations, your duct tape double is now complete! And, as an extra bonus, it has a handy hook right at the top. Pat your fake self on the back, and happy sewing!

No comments:
Post a Comment